www.my-incredible-app.com to your Replit published app.
While Replit provides a free subdomain in the format <your-live-app-subdomain-name>.replit.app, using
a custom domain lets you create a more memorable address.
A custom domain name can help brand recognition and trust with your app’s users.
Watch the following video for a quick overview of setting up Custom Domains:
Connect a domain with automatic setup
The simplest way to connect a domain is to let Replit set it up for you. When you link a domain you already own, Replit configures the required DNS records on your behalf. You no longer have to copy records into your domain provider by hand.DNS records are the settings that tell the internet where your domain should point. Setting them up by hand used to be the trickiest part of connecting a domain. Replit now handles this step for you for most domains and providers.
Open the Publishing tool
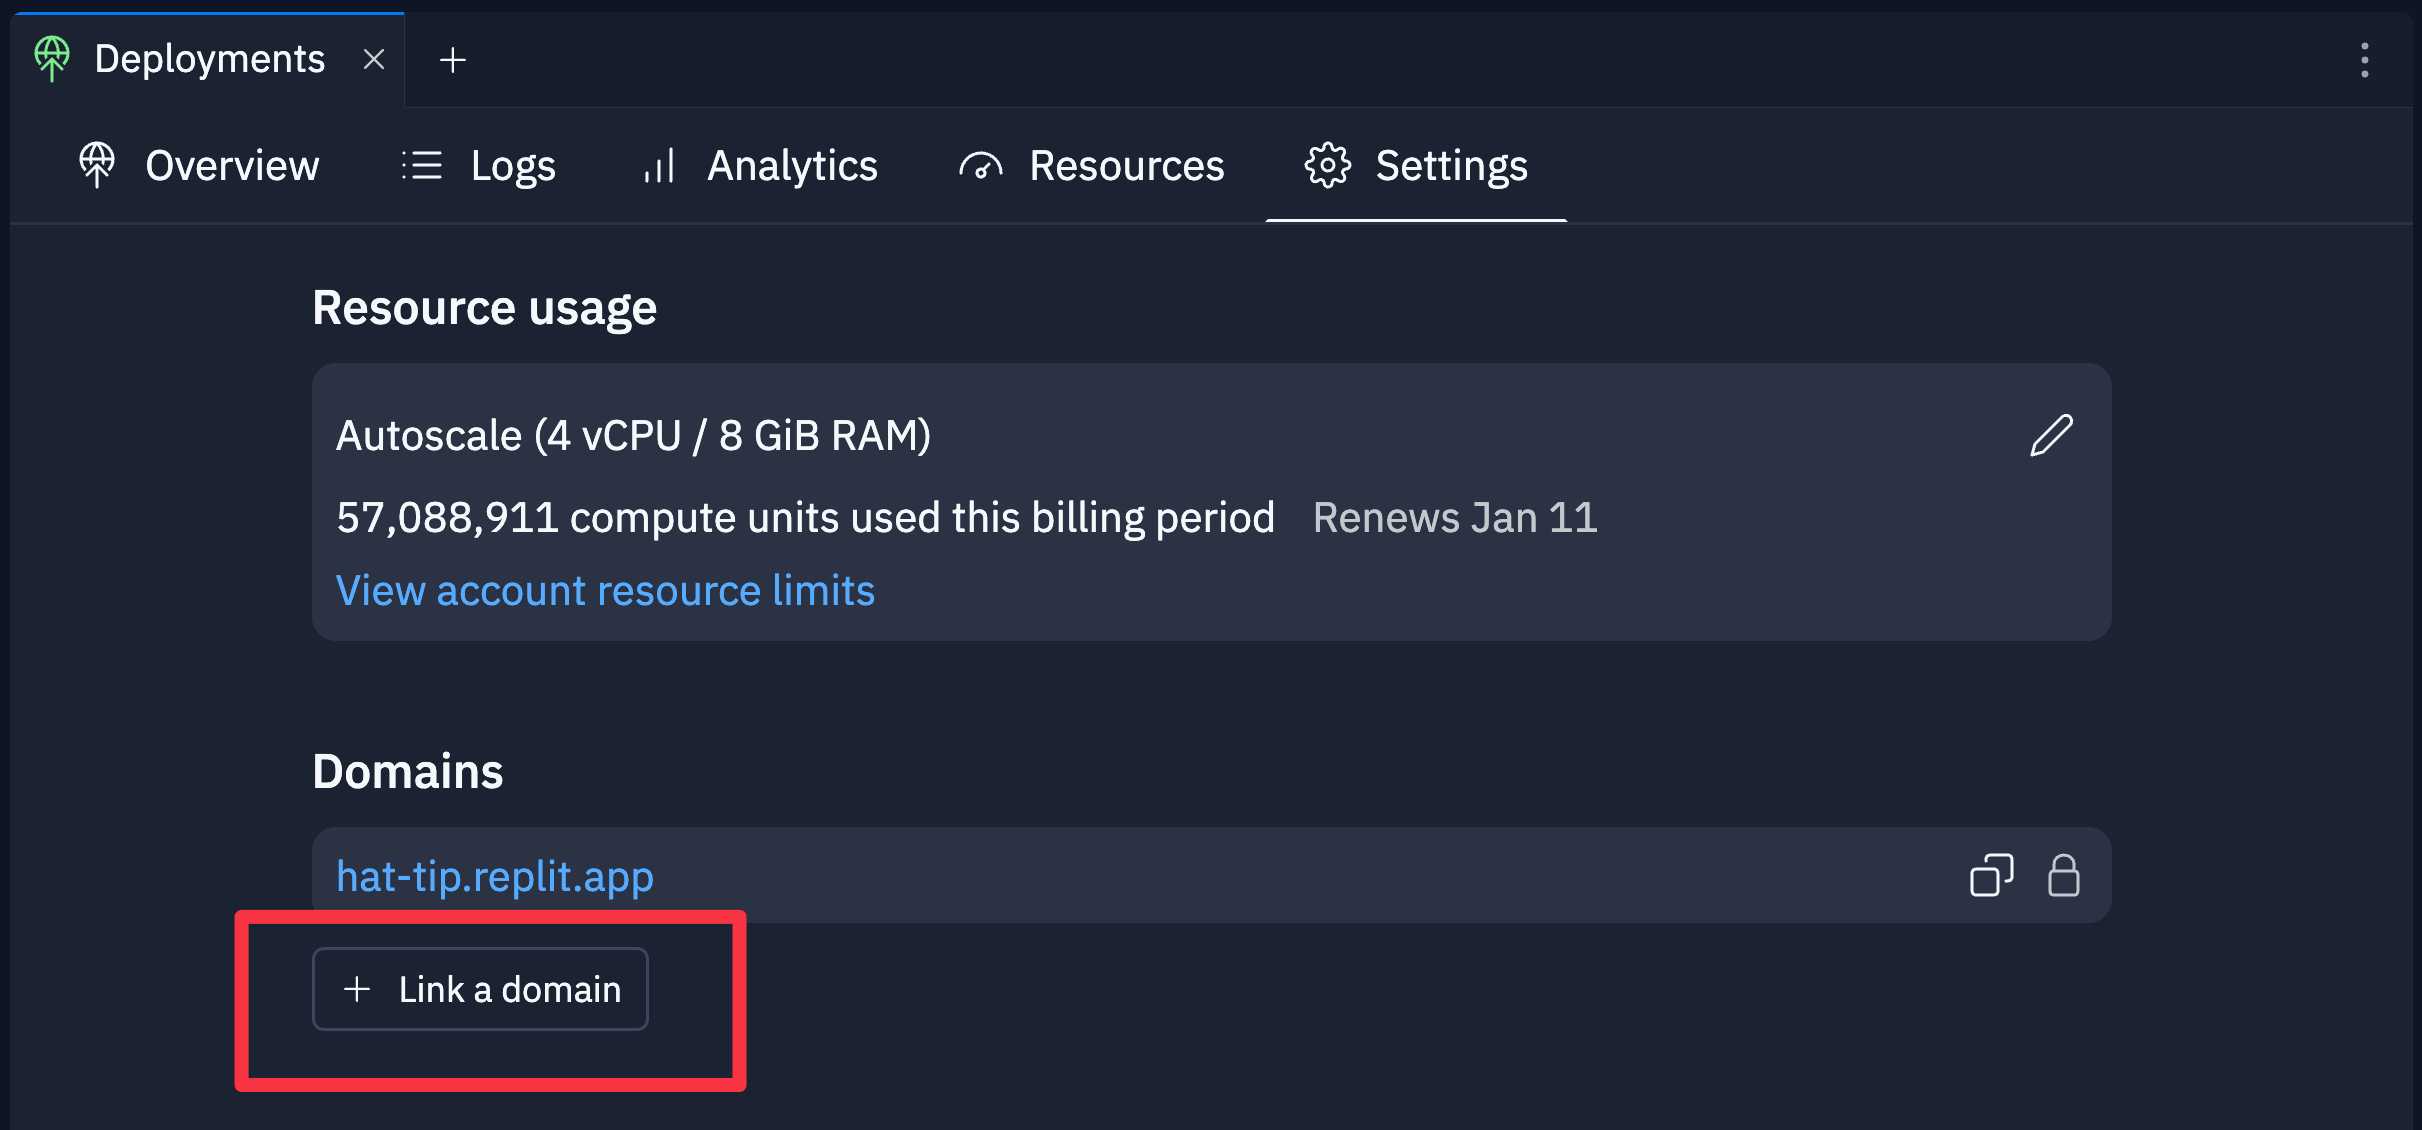
After publishing your app, open the  Publishing tool and select the Domains tab.
Enter the domain you want to connect
Select Link a domain and enter a domain you already own, such as
www.my-incredible-app.com.Confirm and let Replit set up your DNS
Confirm the connection, and Replit sets up the DNS records for you. You may be asked to sign in to your domain provider so the change can be applied to your account.
Features
Custom Domains are available for the following Deployment types: The following table compares Replit’s subdomains with custom domains:| Feature | Replit Subdomain | Custom Domain |
|---|---|---|
| Hostname customization | Subdomain only | Any domain that you own |
| DNS update time | Instant | Up to 48 hours |
| Security Certificates (TLS/SSL) | Provided by Replit | Provided by Replit |
| Price | Free | Pay your domain provider |
Usage
How to access Custom Domains
How to access Custom Domains
- After publishing your app, open the Publishing tool.
- Select the Domains tab.
- Select Link a domain or Manually connect from another registrar as shown in the following screenshot.
Connect a domain manually
If your provider is not supported for automatic setup, or you prefer to add the records yourself, follow the steps below to set up your custom domain manually.Add your custom domain
Enter your custom domain name in the text field. You can use a registered domain or include a subdomain.For example, 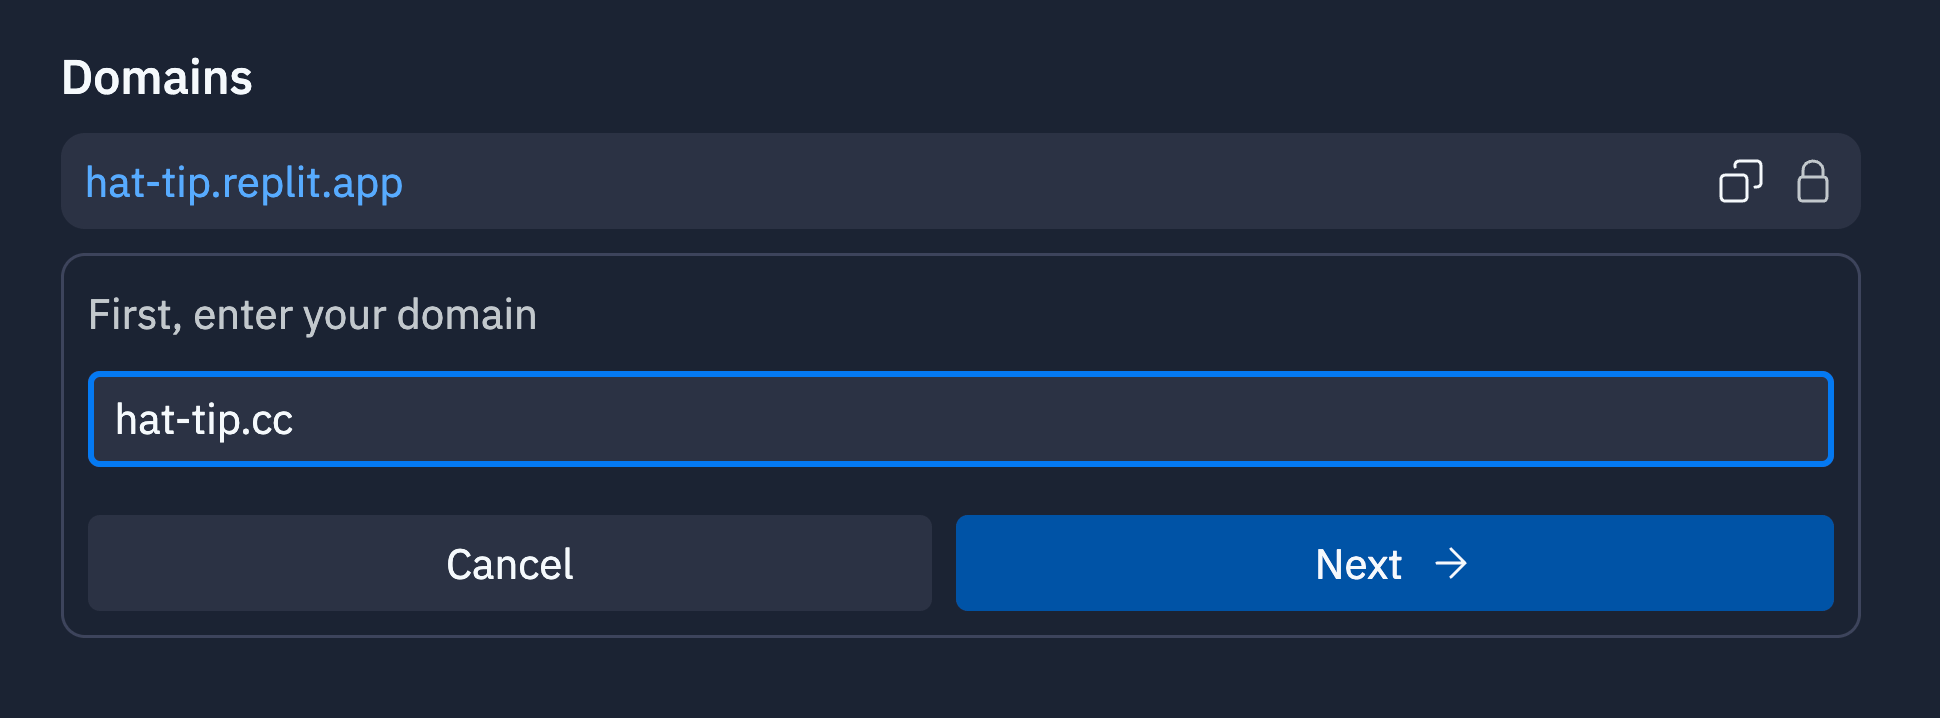
hat-tip.cc is the registered domain and my.hat-tip.cc includes subdomain my.Add the DNS records to your domain registrar
Replit generates DNS records that you must provide to your domain registrar.
A domain registrar is the service that manages your domain name, such as GoDaddy or Namecheap.Copy the
A and TXT record values from Replit and paste them into your domain registrar’s
DNS management section. If your domain registrar does not support @ as a hostname, use your registered domain name.Optional: Add a subdomain
Subdomains — including As with the apex domain, the
www — are not automatically resolvable when you link your apex
domain. Each subdomain you want to serve must be added as its own entry in the Domains
tab and given its own DNS records at your registrar.To add a subdomain, link it from the Domains tab the same way you linked the apex
domain, then add the DNS records Replit generates for it to your domain registrar.
For example, to add my-subdomain.hat-tip.cc:- In the Publishing tool, select the Domains tab and link
my-subdomain.hat-tip.cc. - At your registrar, add a new
Arecord with hostnamemy-subdomainpointing to the IP address Replit shows for the new entry. - At your registrar, add the matching
replit-verify=...TXTrecord on hostnamemy-subdomain— each subdomain has its ownTXTrecord, separate from the apex’s.
www is a subdomain. Linking hat-tip.cc does not automatically serve
www.hat-tip.cc. If you want visitors to reach your app at both hat-tip.cc and
www.hat-tip.cc, add www.hat-tip.cc as a separate entry in the Domains tab and
www.hat-tip.cc, add www.hat-tip.cc as a separate entry in the Domains tab and
publish the A and TXT records it generates on hostname www. Most builders who want
a www address also configure a redirect from the apex to www (or vice versa) atreplit-verify=... TXT record you add for each subdomain
must stay in DNS permanently. See
Keep the TXT record in place below.Wait for DNS propagation to complete
After adding the records, you must wait for them to propagate online.
This can take between a few minutes and 48 hours.When the propagation completes, your Domains tab should show the “Verified” status next to the domain name as shown below: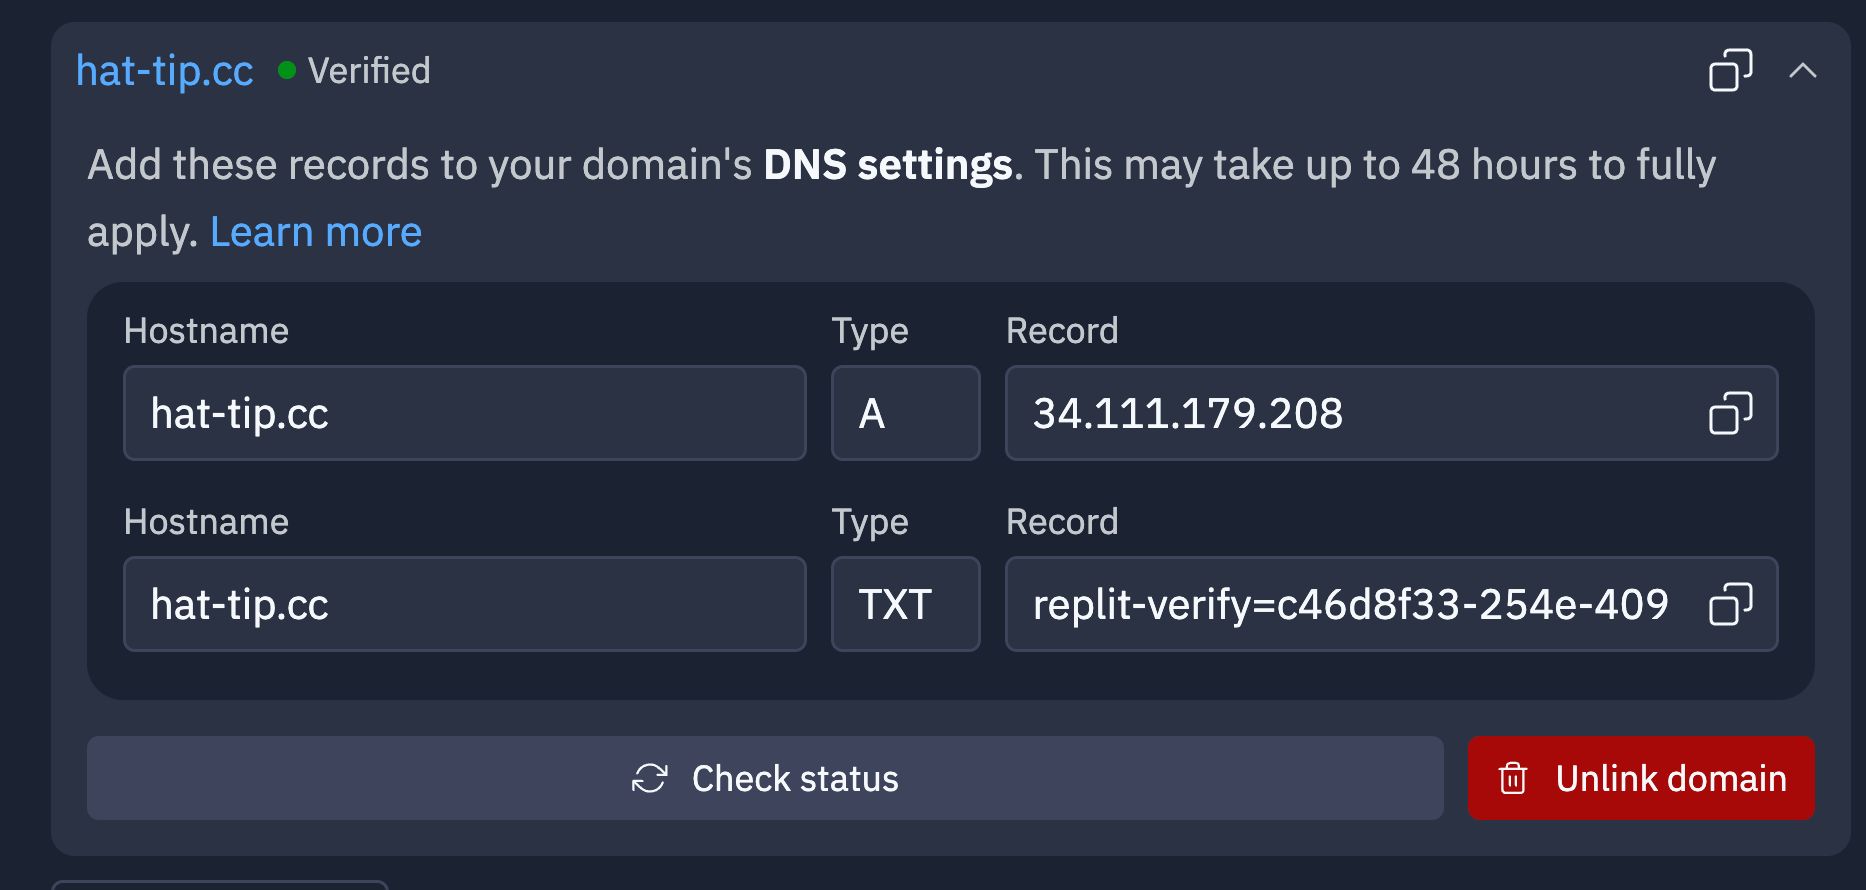
Troubleshooting
Keep the TXT record in place
Replit issues and renews the SSL/TLS certificate for each custom domain through DNS validation, which depends on thereplit-verify=... TXT record you added during setup. The TXT record is not a one-time setup artifact — it must stay in your DNS for the full lifetime of the domain. If the record is removed, edited, or replaced after your domain is verified, the next renewal will fail silently and the existing certificate will eventually expire. Visitors will then see a browser security warning and the app will be unreachable.
If older domains on your account suddenly show certificate errors while newer ones work, a missing or modified TXT record is the most likely cause.
To restore an affected domain:
- Open the Publishing tool and select the Domains tab.
- Confirm the
replit-verify=...TXTrecord Replit shows for the domain. - Add the
TXTrecord back at your domain registrar exactly as shown, including the hostname and value. - Remove the domain in Replit and add it again to trigger a fresh issuance.
- Wait for DNS propagation and re-check the Verified status on the Domains tab.