

Introduction
SCIM is available exclusively for Enterprise customers. Contact our sales team at sales@replit.com to enable this feature for your organization.
Key features
Automated member management
Automatically provision and deprovision members based on your IdP’s directory
Role synchronization
Keep member roles and permissions in sync with your organizational structure
Bulk operations
Efficiently manage large teams with bulk group operations
Major IdP support
Direct integration with Microsoft Entra ID, Okta, and other leading identity providers
Benefits
SCIM integration provides several advantages for Enterprise teams:- Enhanced security: Leverage your existing identity management systems for robust access control
- Simplified administration: Automatically manage team members through your identity provider
- Efficient onboarding: Seamlessly provision large teams without manual intervention
- Consistent access control: Maintain uniform access policies across your organization
Getting started
1
Enable SCIM
Open Settings > Advanced > Identity & Governance to enable SCIM for your Enterprise organization.
2
Configure your IdP
Access the SCIM onboarding portal directly from the Identity & Governance settings. The onboarding portal provides step-by-step instructions specific to your identity provider for synchronizing your user directory.
3
Test the integration
Verify the connection by provisioning a test user.
4
Go live
Begin using SCIM for automated member management, then assign your synced groups to workspaces in SCIM workspace access.
Best practices
- Document role allocations for existing Replit members before enabling SCIM.
- Set a default workspace so every synced group receives at least Viewer access there; without a default workspace, a member has no role until you assign their group to a workspace.
- Test your configuration by provisioning a small group of members before enabling bulk provisioning.
- After initial sync, review and configure permissions for custom groups based on your organization’s access control needs.
- Create one IdP group for each workspace-and-role combination you need — for example,
Replit - Engineering - AdminandReplit - Engineering - Member. You configure each mapping once in Replit, and afterwards you can see who holds which Replit role just by looking at group membership in your IdP. - Use other push groups for categorization and bulk permission management, separate from the role-control groups above.
- Document your SCIM configuration for future reference.
Group synchronization
All pushed groups from your IdP are synchronized to Replit with the members your IdP provisions for that group. When you push an “Engineering” group through SCIM, Replit creates a matching group containing those provisioned members. Group membership is automatically updated to reflect the membership in your IdP. You can use these synchronized groups for bulk editing member permissions, such as sharing an app with everyone in the “Engineering” group.Use flat groups with Microsoft Entra ID
Use flat groups for SCIM provisioning by adding users directly to each group you assign to Replit. If you must keep nested groups in Microsoft Entra ID, assign every group that directly contains users to the Replit application. For details, see Microsoft’s guidance on assignment-based scoping.Creating custom groups alongside SCIM
You can create custom groups in Replit even when SCIM is enabled. Use custom groups to organize members around project work, one-off permission grants, or any structure that is not mirrored in your identity provider.- SCIM groups remain locked. Groups synced from your IdP can only be edited or removed through your identity provider.
- Custom groups are managed in Replit. Organization admins can create, edit, and delete custom groups directly from the Groups page.
- Members can belong to both. A member provisioned through SCIM can also be added to custom groups without affecting their IdP-managed roles.
Managing workspace access
Once SCIM is active, use the in-product management surface to review and control how your synced groups map to workspaces and roles, and to designate the account admin group. Your IdP remains the source of truth for membership and provisioning; this surface governs how those synced groups and members map onto your Replit workspaces and roles — it does not add, remove, or re-provision members.Structure your workspaces
We generally recommend keeping your members in a single workspace, and only creating additional workspaces when there’s a clear reason to separate them — for example, distinct business units that should not share members, groups, or budgets. Anyone who needs to collaborate should be in the same workspace. You can assign your synced groups to workspaces. Within a workspace, an assigned group appears as a custom group that you can use for workspace-level controls such as group budgets — for example, a 100K budget for the Revenue team.Open SCIM workspace access
- Open the workspace switcher and select your Enterprise workspace.
- Open Settings, then select Advanced.
- Expand the Identity & Governance section and find the Automatic member provisioning (SCIM) card.
- When SCIM is Active, the management surface appears directly inside this card.
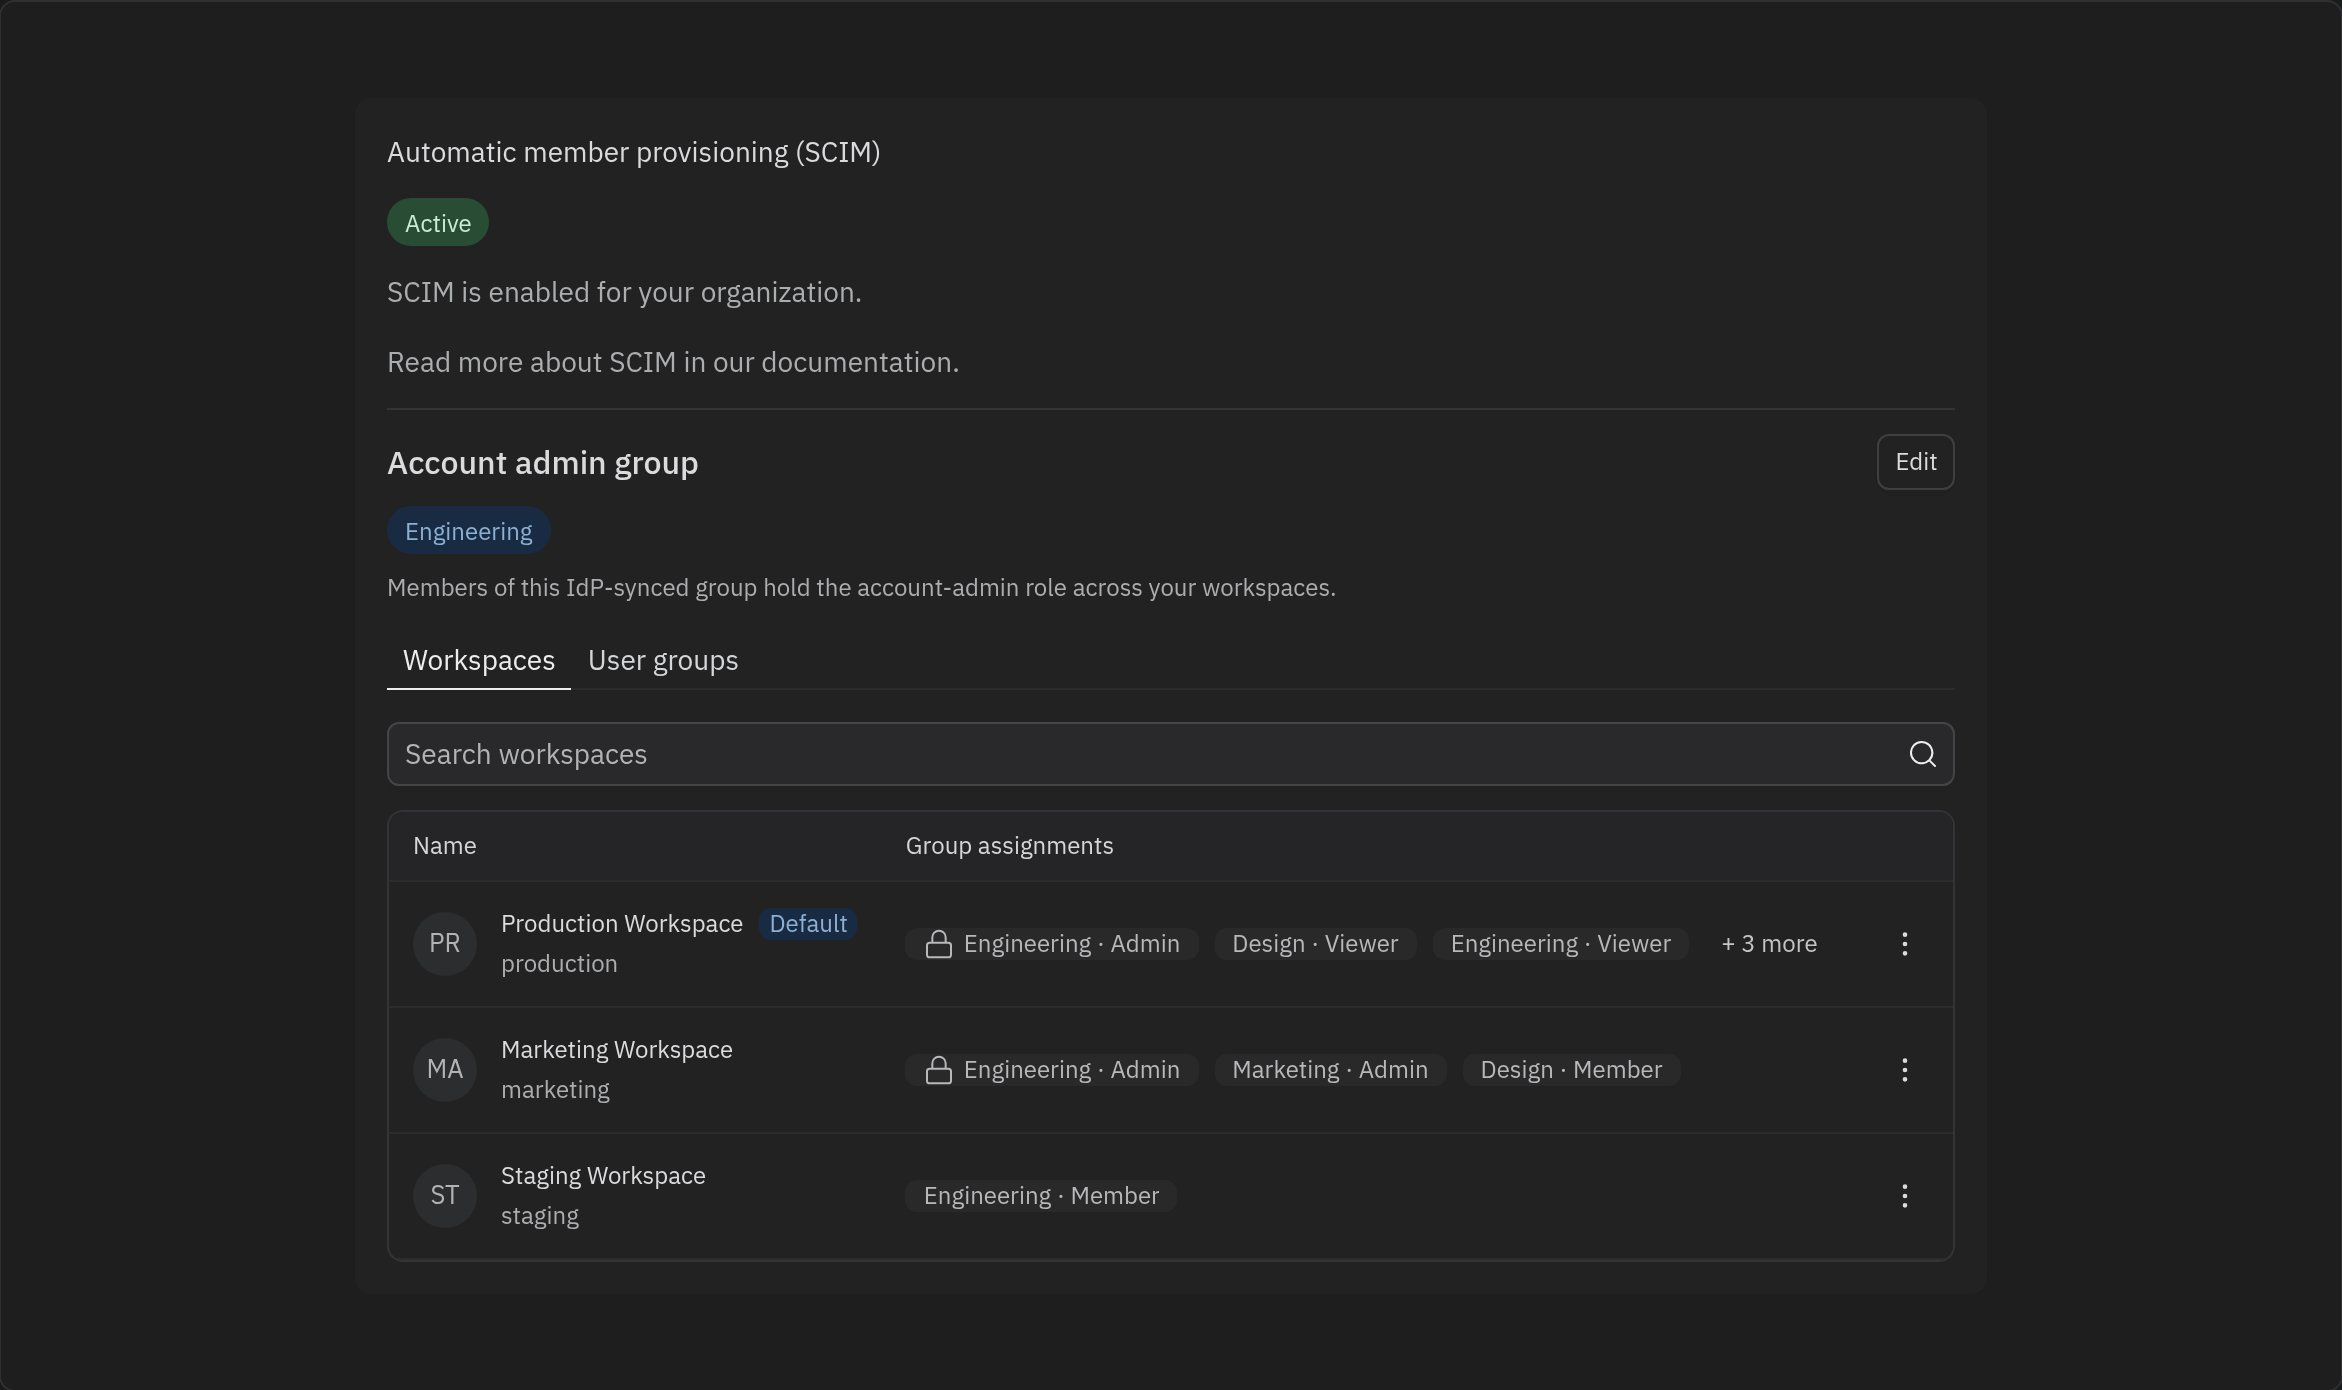
Designate the account admin group
Set this first. The Account admin group block at the top shows which IdP-synced group holds the account admin role across all of your workspaces, and has access to account-level settings, including SCIM management privileges. Select Edit to choose a different synced group. Designating a group is a cutover: the new group becomes the account admin group and the previous group’s account admin role is revoked. Because account admins are powerful, the change requires confirmation before it takes effect.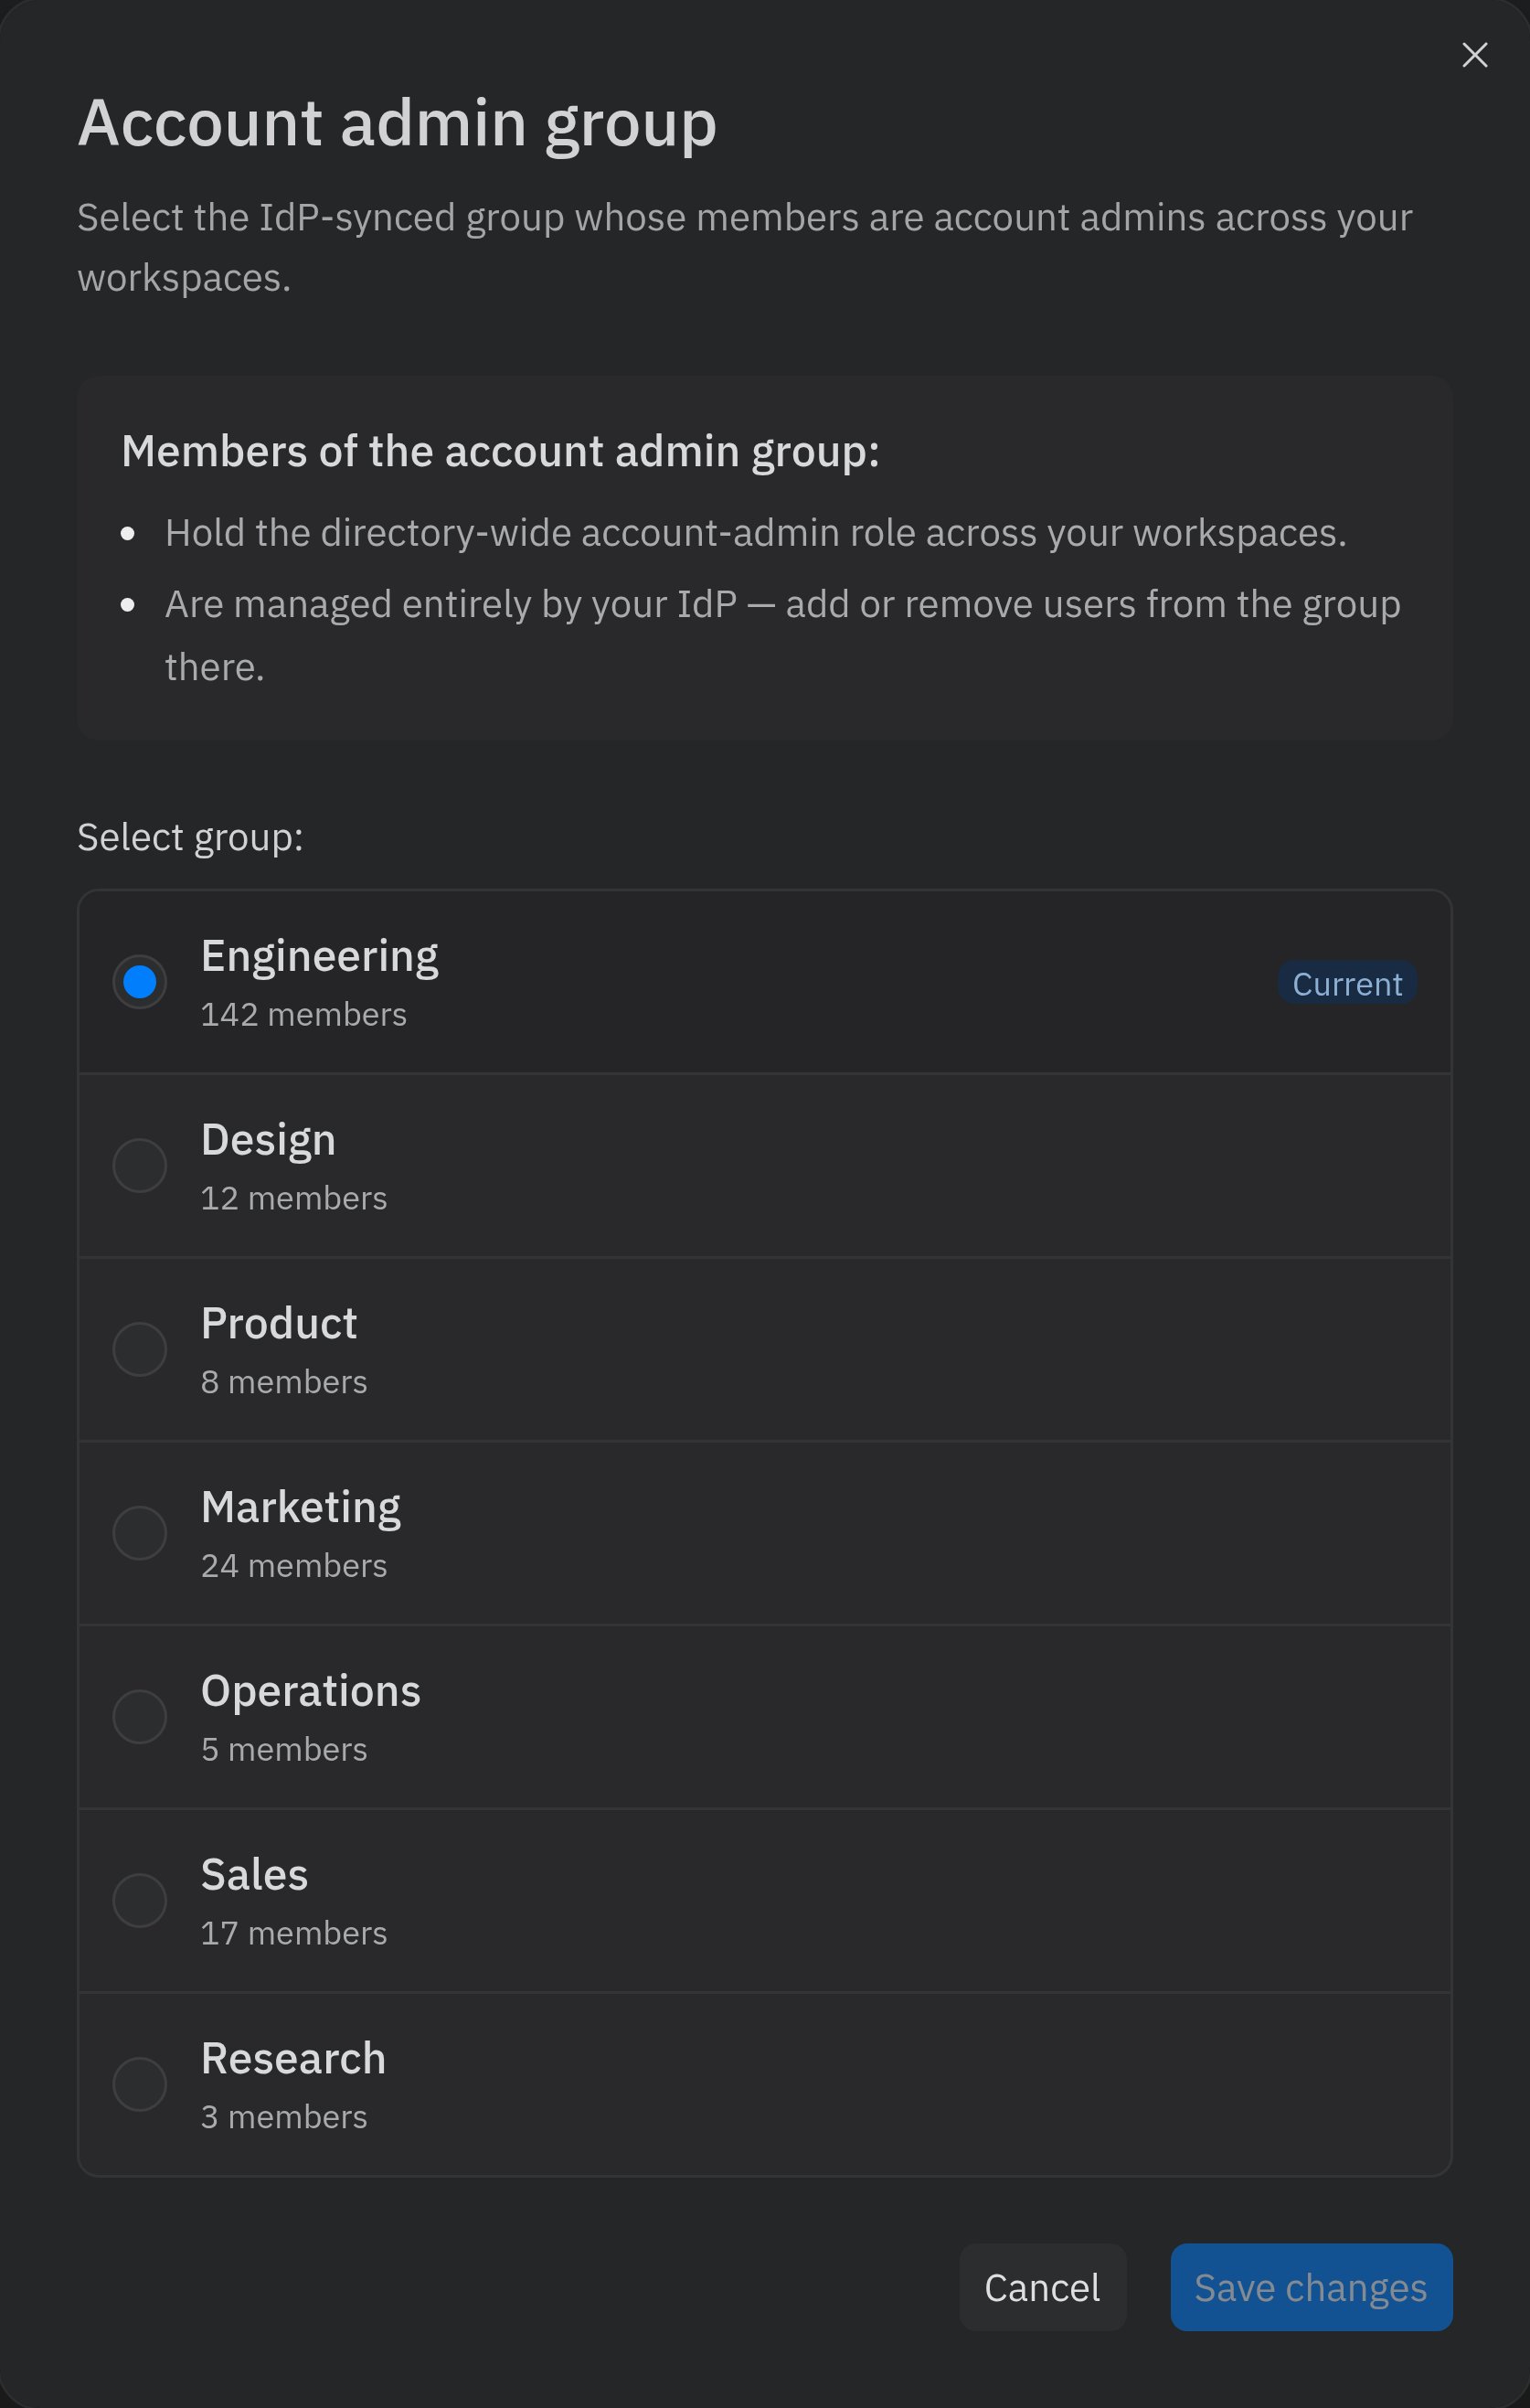
Membership of the account admin group is managed entirely in your identity provider. To add or remove account admins, change who belongs to the designated group in your IdP — the surface reflects that membership but does not edit it.
View and manage workspace assignments
The Workspaces tab lists every workspace in your organization alongside the synced groups assigned to it and each group’s role. The default workspace — marked with a Default pill — is the baseline for provisioned access: every synced group automatically receives at least Viewer access there, so members always have somewhere to land. A workspace becomes the default only when an admin sets it; until then, members get access solely from the group assignments you make.- Use the search box to filter workspaces by name.
- Each row shows its group assignments as chips in the form Group · Role (for example, Engineering · Admin). When a workspace has more assignments than fit on one row, a + N more chip indicates the remainder.
- The row’s ⋮ menu lets you edit assignments or set or remove the workspace as the organization default.
Assign groups to workspaces and set roles
Select Edit assignments from a workspace row’s ⋮ menu to open the Edit workspace access dialog. Here you choose which synced groups have access to the workspace and the role each group receives:- Admin — full administrative access to the workspace’s settings and resources. This is the workspace admin role, scoped to this workspace only.
- Member — can create and edit projects.
- Viewer — read-only access to apps and deployments.
- Guest — can only access apps shared with them.
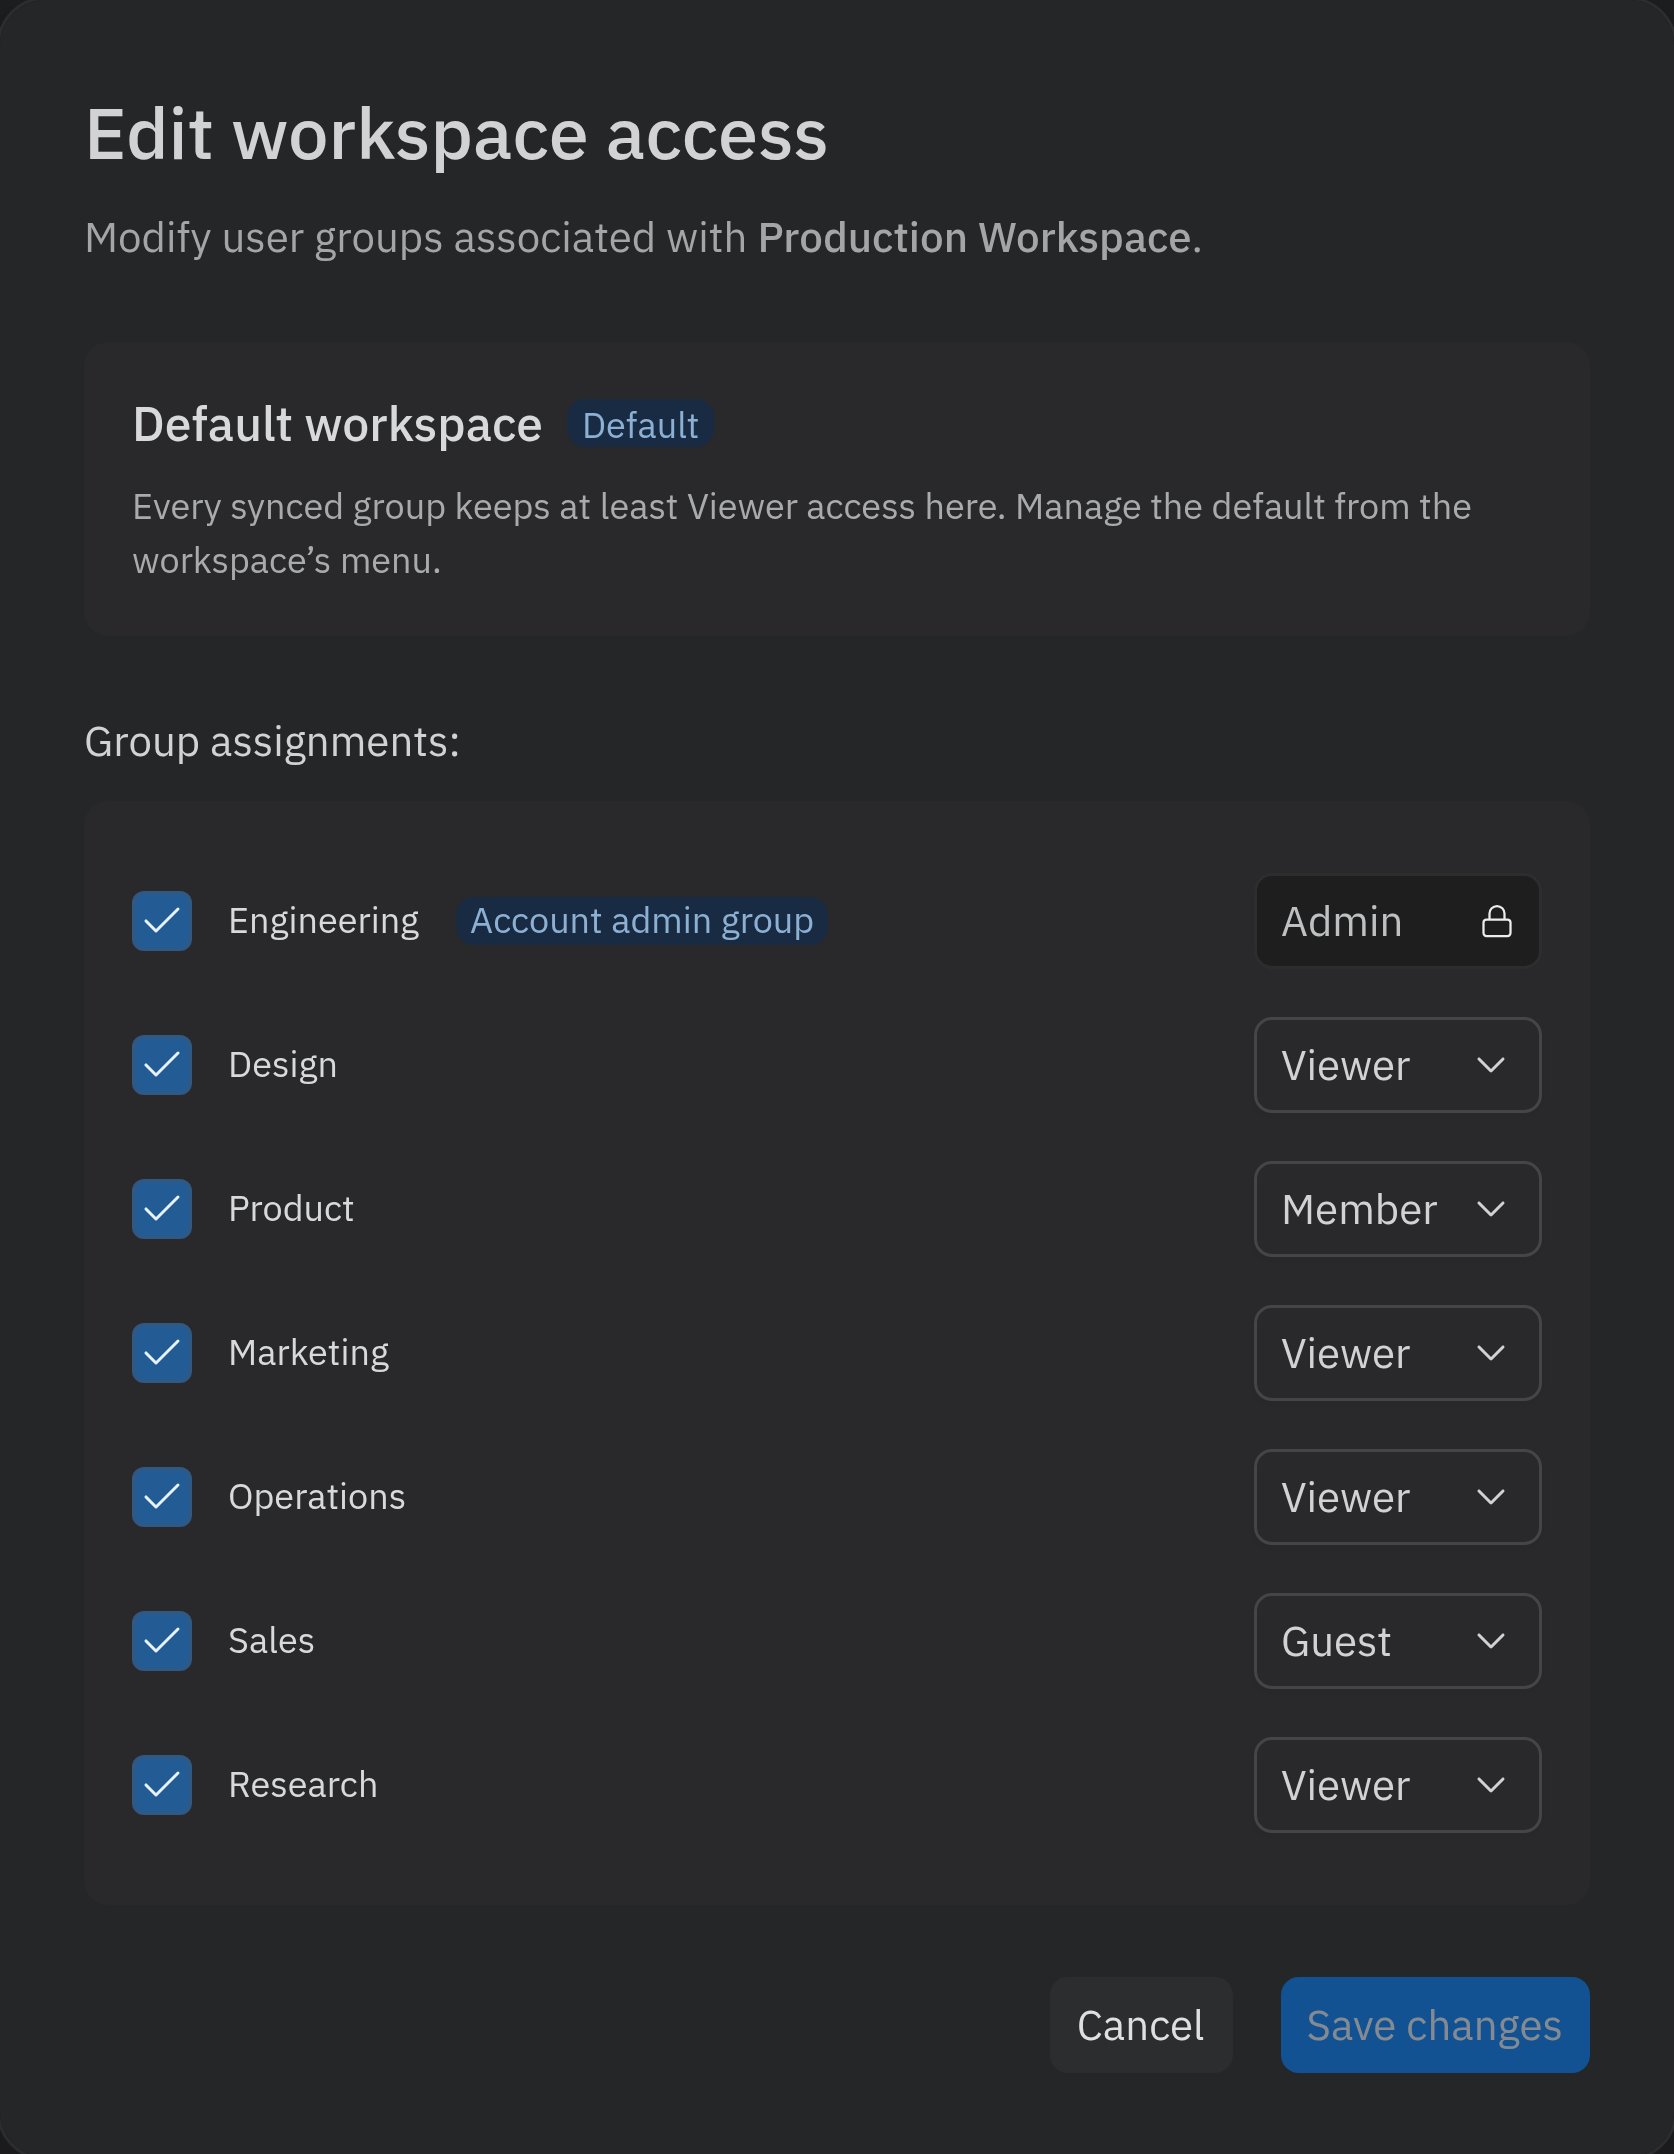
Appoint workspace admins
When SCIM is enabled, you can’t promote an individual member to workspace admin from the workspace’s members page — roles for provisioned members are controlled by group assignments. To appoint workspace admins:1
Create an admin group in your IdP
Create a dedicated group for that workspace’s admins — for example,
Replit - Engineering - Admin — add the intended admins to it, and push the group to Replit through SCIM.2
Assign the group the Admin role
In SCIM workspace access, select Edit assignments on the workspace, check the new group, and set its role to Admin.
The per-workspace Admin role is not the same as account admin. Account admins are designated only through the account admin group and have administrative access across every workspace, plus billing and account-level settings. See Account and Workspace Admins for a comparison.
View group members and assigned workspaces
The User groups tab is a table of your synced groups, with columns for the group Name, its Assigned workspaces (shown as Workspace · Role chips), and its Member count. The group designated as the account admin group is marked with an Account admin group chip. When you have many groups, the table is paginated — use the page controls at the bottom to move between pages.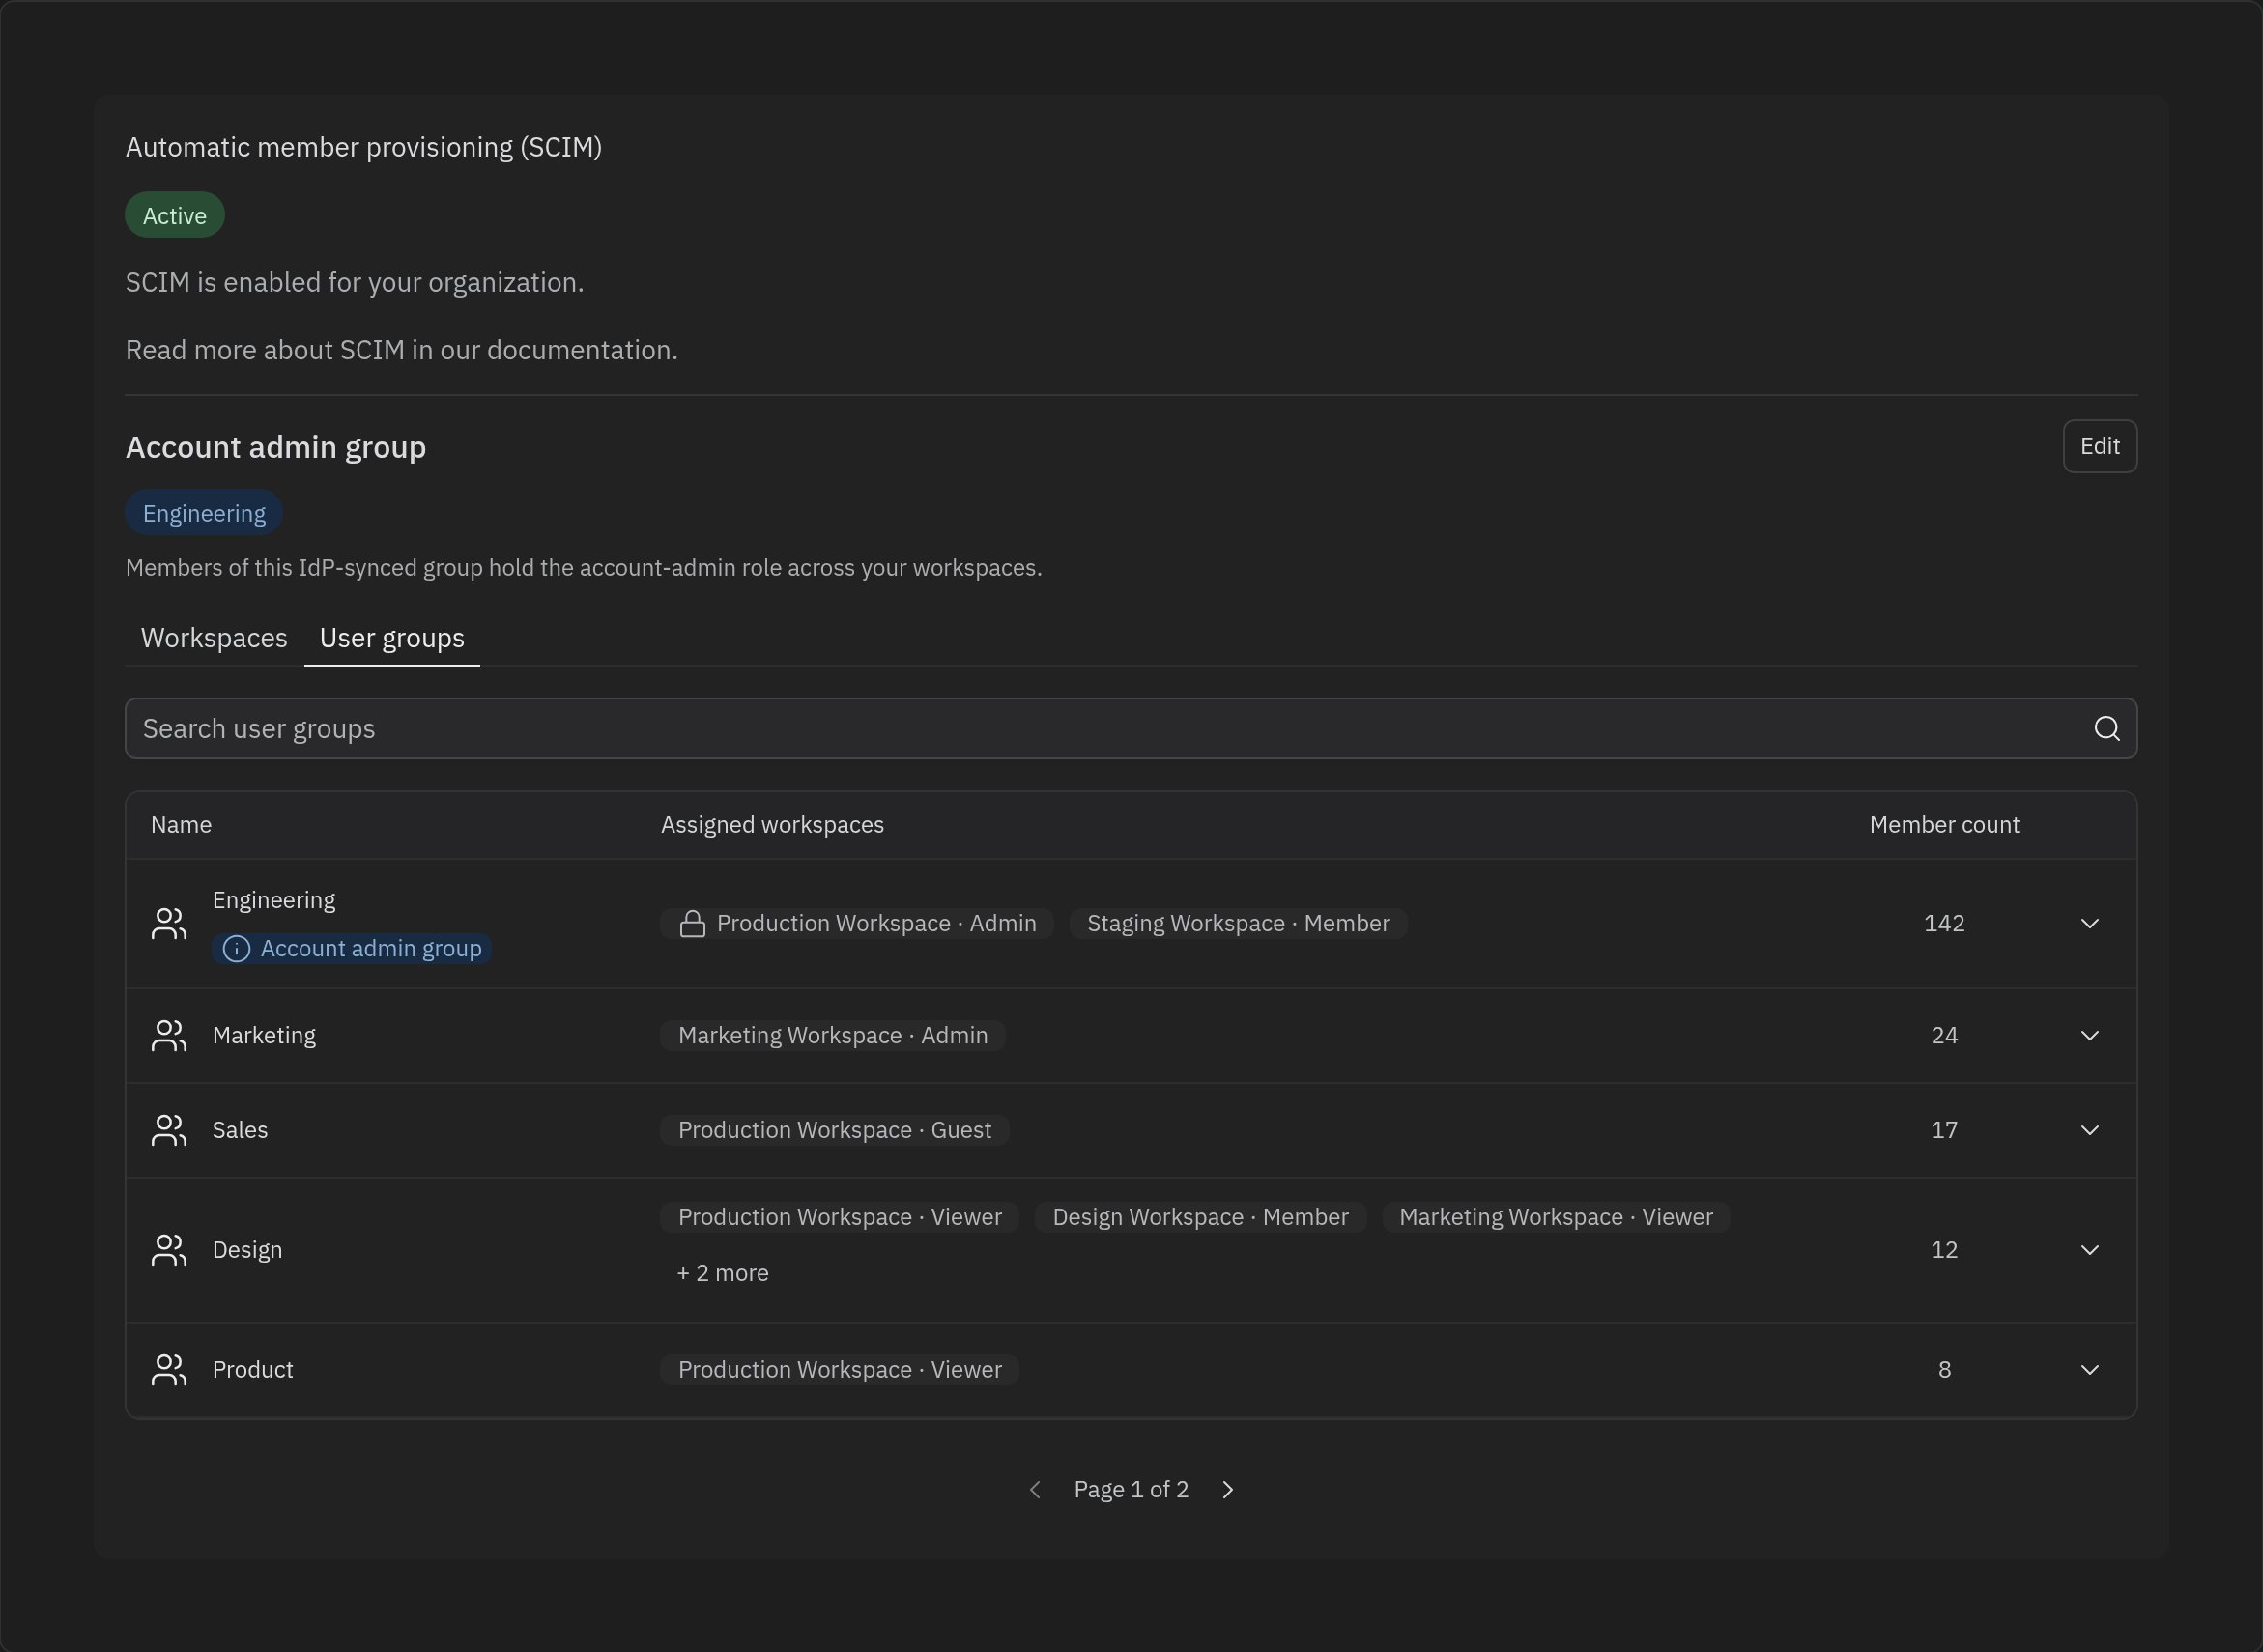
Limitations
- Your IdP remains the source of truth. Adding, removing, and provisioning members — and editing group membership — happens in your identity provider. Replit manages workspace and role assignments for groups that already exist in your synced directory.
- Microsoft Entra ID does not expand nested groups. Use flat groups or assign every group that directly contains users to the Replit application, as described in Use flat groups with Microsoft Entra ID.
- The account admin group can be changed but not cleared. You can designate a different account admin group, but there is no option to leave the organization without one.
FAQs
What happens to members who already have accounts on replit.com before SCIM was set up?
When SCIM is enabled, existing members are handled in two ways:- Members provisioned through SCIM:
- Their roles are updated to match those provided by your IdP.
- These members can only be added, removed, or have their roles changed through your IdP.
- To keep permissions synchronized, admins can no longer edit roles or invite new members within Replit.
- Members not provisioned through SCIM:
- These members remain unchanged and are considered “legacy” members.
- Their organization membership and role is not automatically removed, to prevent accidental deprovisioning.
- Legacy members can be removed through the Replit interface by organization admins if needed.
What roles can be provisioned with SCIM?
SCIM users can be assigned to four roles:- Admin: Full administrative access to a workspace’s settings and resources (workspace admin)
- Member: Standard access to create and edit Replit Apps
- Guest: Limited access for external collaborators; can only edit apps explicitly shared with them
- Viewer: Read-only access to published applications
How do I make someone a workspace admin?
Add them to an IdP group that is assigned the Admin role on that workspace. We recommend a dedicated group per workspace, such asReplit - Engineering - Admin — see Appoint workspace admins. You can’t promote provisioned members individually from the workspace’s members page while SCIM is enabled.
How do I make someone an account admin?
Add them to the designated account admin group in your IdP. Assigning a group the Admin role on a workspace makes its members workspace admins of that workspace only — it does not grant account admin.Can I add or remove members from SCIM workspace access?
No. Membership and provisioning are managed in your identity provider. The surface manages how synced groups and members map to workspaces and roles. For day-to-day member management outside of SCIM, see Managing Members.How are roles different from groups?
Groups are synced from your IdP. Roles (Admin, Member, Viewer, Guest) describe what a group can do in a specific workspace. The same group can hold different roles in different workspaces — for example, Member in one workspace and Viewer in another.Does changing the account admin group affect other roles?
Designating a new account admin group changes only the organization-wide account admin role. Other group-to-workspace assignments and their roles are unaffected. For more on how the account admin role works, see Account and Workspace Admins.Related resources
SAML SSO
Learn about SAML single sign-on integration
Groups & Permissions
Understand how to manage user roles and access
Account and Workspace Admins
Learn what account admins and workspace admins can do
Viewer Seats
Understand read-only viewer access and seats